
How to automatically submit URLs to Google indexing API with Netlify
If you're wondering why your latest posts are not showing up in Google search results, it's probably because Google does not care enough about your website to continually index and recrawl your content. Google has a crawl budget and they don't want to waste it on all of our (very important) blog posts.
If you're an established domain, then sure, maybe Google will step it up. But if you're a new website, then you need to help Google out. Most of the time, that means you're going to Google Search Console, submitting your sitemap, and then manually submitting URLs to Google to have them indexed.
And then you wait and pray. Sometimes for days, weeks, or even months before Google indexes your content.
That might be OK if you're just managing one website, but if you've got a few of your own sites, or you're managing clients, then this process can get very tedious, not to mention unpredictable. Submitting URLs to Google Search Console is a manual process, and it can be a pain to keep track of which URLs you've submitted and which ones still need indexing.

How to automatically submit URLs to Google indexing API with Netlify
In this post, I'll show you how to set up a Netlify function to automatically submit URLs to Google indexing API anytime you publish new content. Along with the the function itself, this workflow requires setting up a Google Cloud project and enabling the Indexing API.
Now of course there are paid services that can do this for you, but Google allows up to 200 URL submissions per day for free. So why not go through this one time setup and save yourself time and money in the long run?
Should you use the Google Indexing API?
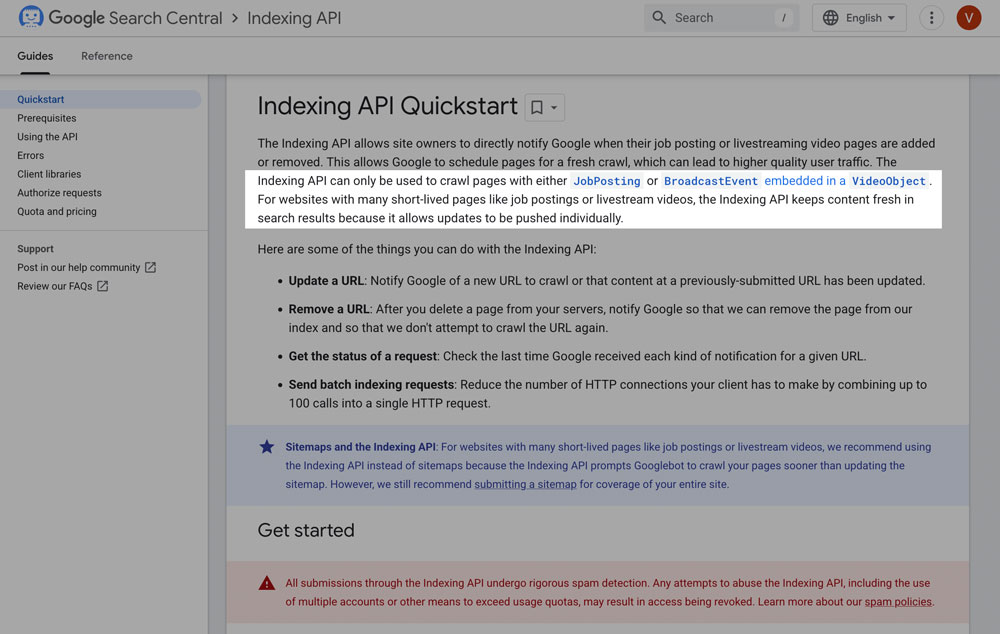
Before we get into the details, there's an important consideration: the Google Indexing API is primarily intended for sites that publish content that needs to be indexed quickly, such as job postings or live events. If your site doesn't fall into these categories, you might not need to use the Indexing API at all.
And in fact, Google has stated that the Indexing API is not intended for general use, and they may limit access to it in the future. So if you're just looking to get your blog posts indexed, you might be better off relying on the standard sitemap submission process.
Will it hurt your rankings to use the Indexing API? Sources say no, but it may not help either. There have been reports that after using the indexing API, URLs get indexed immediately and then de-indexed later on, reverting back to the main schedule and process for crawling.
In my experience implementing SEO strategies on sites for over 20 years, I know there's no magic bullet for anything related to Google ranking. But they also will not provide any tips on how to game their system, or sidestep their algorithms.
So for me, I choose to do anything I can to give me a leg up as long as the end goal is to get good, legitimate content in front of people searching for it. That's the definition of Search Engine Optimization, after all. Optimizing your website to be found in search engines.
Step 1: The Netlify function
If you are using Netlify to host your site, you can take advantage of their free serverless functions without much hassle. This function assumes you have a static site generator that outputs to the public directory, including a sitemap.xml file.
I'm using 11ty as my static site generator, hosted on Netlify using the Decap CMS (you can read more at Building this site with Decap, 11ty, Nunjucks). But you can use any static site generator that outputs a sitemap to the public directory, or change the function to point to your sitemap location.
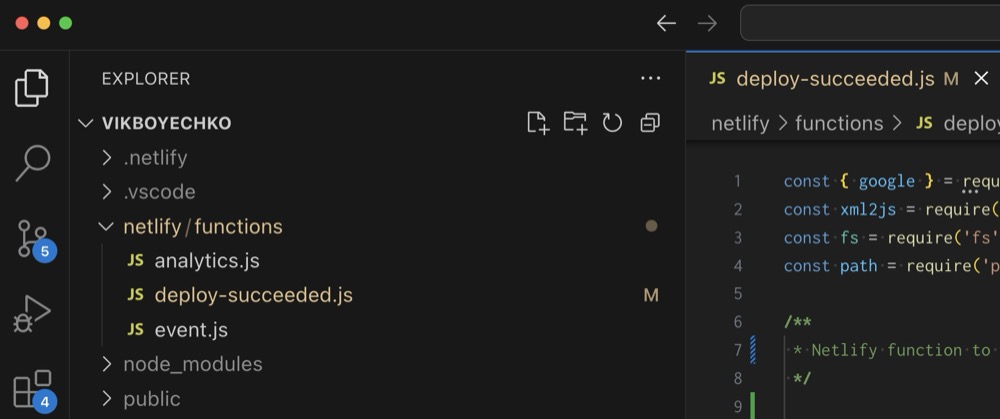
If this is your first Netlify function, create a netlify folder in the root of your project, and then a functions folder inside of it. Then create a new file called deploy-succeeded.js inside of the functions folder.
Why deploy-succeeded? Because we want this function to only run after a successful deployment, not on every local build. And Netlify provides a deploy-succeeded event that we can use to trigger our function. If you want to name function something more specific, then you'll have to add specific instructions to the netlify.toml file.
So we'll stick with deploy-succeeded. Here's the function, and the explanation below it.
const { google } = require('googleapis');
const xml2js = require('xml2js');
const fs = require('fs').promises;
const path = require('path');

/**
 * Netlify function to submit URLs to Google Indexing API
 */

const INDEX_ALL = false; // Set to true for first deployment to index all URLs, then change to false
const MAX_DAILY_SUBMISSIONS = 150; // Safety buffer below Google's 200 daily limit

exports.handler = async function (event, context) {
  console.log('--- Deploy Succeeded Function Triggered ---');

  // Block ALL direct browser/HTTP access - only allow Netlify deploy events
  if (event.httpMethod === 'GET') {
    console.log('Direct GET request blocked. This function only runs on deploy events.');
    return {
      statusCode: 403,
      body: JSON.stringify({
        error: 'This function is only triggered by Netlify deploy events.'
      })
    };
  }

  console.log('--- Starting Content Indexing ---');

  // Define sitemap path (hardcoded since we know it's always public/sitemap.xml)
  const sitemapPath = path.join('public', 'sitemap.xml');
  console.log(`Reading sitemap from: ${sitemapPath}`);

  // Read current sitemap
  let currentSitemapContent;
  try {
    currentSitemapContent = await fs.readFile(sitemapPath, 'utf-8');
  } catch (error) {
    console.log('Could not read current sitemap.xml - skipping indexing');
    return {
      statusCode: 200,
      body: JSON.stringify({
        success: true,
        message: 'Skipped: Could not read current sitemap.xml'
      })
    };
  }

  // Parse current sitemap
  const parser = new xml2js.Parser();
  let currentUrls = [];
  try {
    const sitemapResult = await parser.parseStringPromise(currentSitemapContent);
    if (sitemapResult.urlset && sitemapResult.urlset.url) {
      currentUrls = sitemapResult.urlset.url.map((urlEntry) => ({
        url: urlEntry.loc[0],
        lastmod: urlEntry.lastmod ? urlEntry.lastmod[0] : null
      }));
    }
  } catch (error) {
    console.log('Could not parse current sitemap.xml - skipping indexing');
    return {
      statusCode: 200,
      body: JSON.stringify({
        success: true,
        message: 'Skipped: Could not parse current sitemap.xml'
      })
    };
  }

  if (currentUrls.length === 0) {
    console.log('No URLs found in current sitemap - skipping indexing');
    return {
      statusCode: 200,
      body: JSON.stringify({
        success: true,
        message: 'Skipped: No URLs found in sitemap'
      })
    };
  }

  console.log(`Found ${currentUrls.length} URLs in current sitemap`);
  console.log(`INDEX_ALL setting: ${INDEX_ALL}`);

  // Find URLs to index based on INDEX_ALL setting
  let urlsToIndex = [];

  if (INDEX_ALL) {
    // Index all URLs
    urlsToIndex = currentUrls.map((item) => item.url);
    console.log(`INDEX_ALL is true - will index all ${urlsToIndex.length} URLs`);
  } else {
    // Find URLs modified in the last 6 hours
    const sixHoursAgo = new Date(Date.now() - 6 * 60 * 60 * 1000);

    for (const currentItem of currentUrls) {
      if (currentItem.lastmod) {
        const lastmodDate = new Date(currentItem.lastmod);
        if (lastmodDate > sixHoursAgo) {
          urlsToIndex.push(currentItem.url);
          console.log(`Recently modified URL: ${currentItem.url} (modified: ${currentItem.lastmod})`);
        }
      }
    }

    console.log(`Found ${urlsToIndex.length} recently modified URLs (within 6 hours)`);

    // Limit to MAX_DAILY_SUBMISSIONS
    if (urlsToIndex.length > MAX_DAILY_SUBMISSIONS) {
      console.log(`Too many URLs to submit (${urlsToIndex.length}). Limiting to ${MAX_DAILY_SUBMISSIONS} to stay within daily quota.`);
      urlsToIndex = urlsToIndex.slice(0, MAX_DAILY_SUBMISSIONS);
    }
  }

  // If no URLs to index, exit
  if (urlsToIndex.length === 0) {
    const message = INDEX_ALL ? 'No URLs found to index' : 'No recently modified URLs found - no indexing needed';
    return {
      statusCode: 200,
      body: JSON.stringify({
        success: true,
        message: message
      })
    };
  }

  // Check if Google indexing is configured
  const serviceAccountKeyJson = process.env.GOOGLE_SERVICE_ACCOUNT_KEY;
  if (!serviceAccountKeyJson) {
    console.log('Google Indexing API not configured - skipping indexing');
    return {
      statusCode: 200,
      body: JSON.stringify({
        success: true,
        message: 'Google Indexing API not configured'
      })
    };
  }

  console.log('--- Starting Google Indexing API Operations ---');

  // Parse service account credentials
  let serviceAccountCredentials;
  try {
    serviceAccountCredentials = JSON.parse(serviceAccountKeyJson);
  } catch (error) {
    console.error('Failed to parse GOOGLE_SERVICE_ACCOUNT_KEY:', error);
    return {
      statusCode: 500,
      body: JSON.stringify({
        success: false,
        message: 'Invalid Google service account credentials'
      })
    };
  }

  // Set up Google API client
  const indexType = INDEX_ALL ? 'all URLs' : 'recently modified URLs';
  console.log(`Submitting ${urlsToIndex.length} ${indexType} to Google Indexing API...`);

  const jwtClient = new google.auth.JWT(
    serviceAccountCredentials.client_email,
    null,
    serviceAccountCredentials.private_key,
    ['https://www.googleapis.com/auth/indexing'],
    null
  );
  const indexing = google.indexing({ version: 'v3', auth: jwtClient });

  // Submit URLs to Indexing API
  const results = [];
  let successCount = 0;

  for (const url of urlsToIndex) {
    try {
      const res = await indexing.urlNotifications.publish({
        requestBody: { type: 'URL_UPDATED', url: url },
      });
      results.push({
        url: url,
        success: true,
        status: res.status
      });
      successCount++;
      console.log(`✓ Submitted ${url} to Indexing API (Status: ${res.status})`);
    } catch (error) {
      console.error(`✗ Error submitting ${url} to Indexing API:`, error.message);
      results.push({
        url: url,
        success: false,
        error: error.message
      });
    }
  }

  const indexTypeMsg = INDEX_ALL ? 'all URLs' : 'recently modified URLs';
  const message = `Successfully submitted ${successCount}/${urlsToIndex.length} ${indexTypeMsg} to Google Indexing API`;
  console.log('--- Finished Google Indexing API Operations ---');
  console.log(message);

  return {
    statusCode: 200,
    body: JSON.stringify({
      success: true,
      message: message,
      indexAll: INDEX_ALL,
      totalUrlsInSitemap: currentUrls.length,
      urlsSubmitted: urlsToIndex.length,
      successfulSubmissions: successCount,
      results: results
    }, null, 2)
  };
};
What does this Netlify function do?
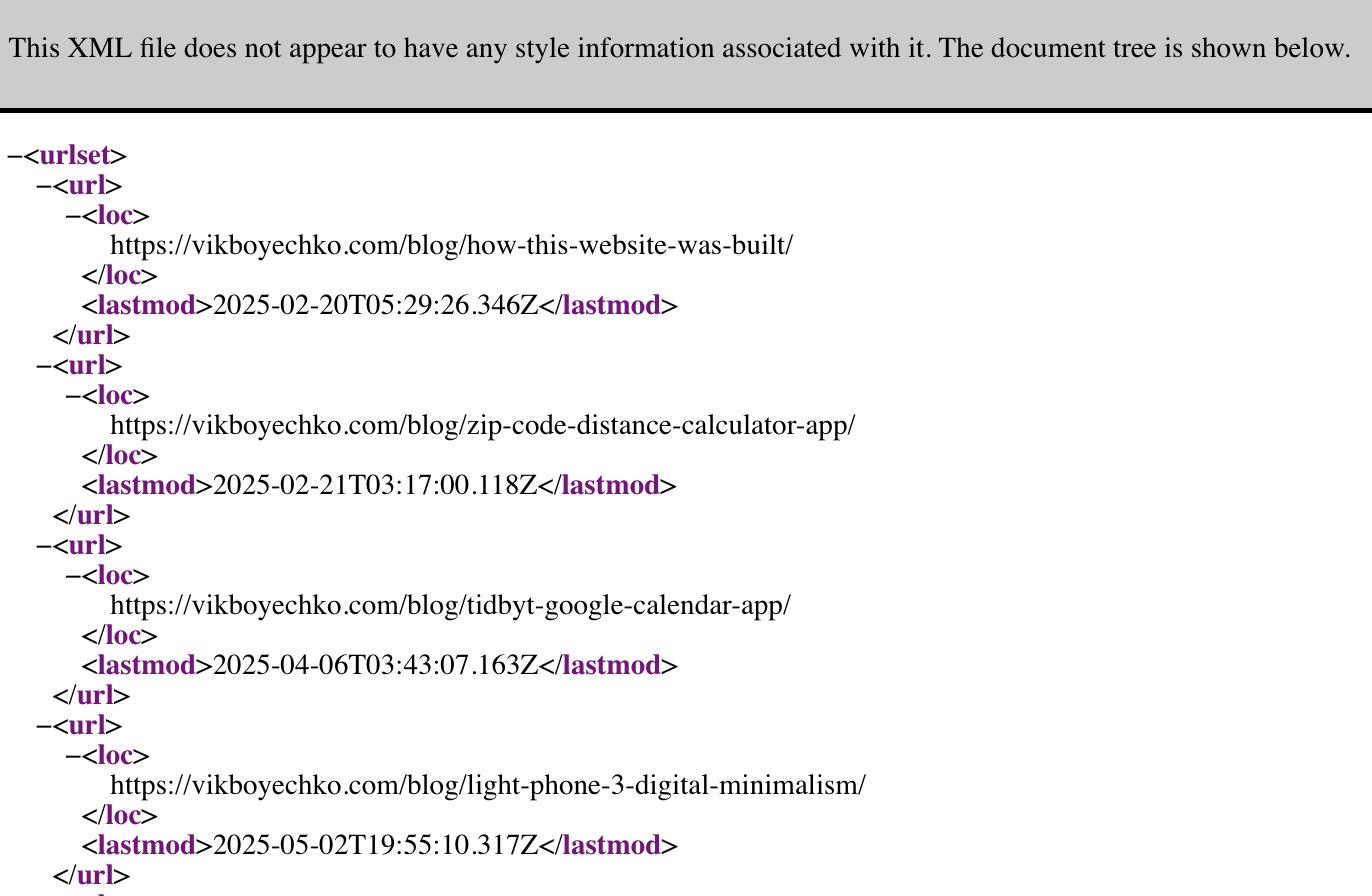
This Netlify function checks your sitemap for URLs that have been modified in the last 6 hours. Each URL has a lastmod tag that indicates when it was last modified. So if the URL has been modified in the last 6 hours, it is submitted to Google Indexing API.
Why 6 hours? I found that this is a good balance, where you can work on your site for a while, and then when you're ready to publish or update content, you'll typically be within the 6 hour window of whatever your content modified date. But of course you can adjust this value to your liking.
One thing to note is at least with a Decap CMS and 11ty setup, since pages don't have a published date in the frontmatter, they may all be considered recently modified anytime you build your site. But as long as you've got less than 200 posts you should be fine without getting charged for those unnecessary submissions.
Blocking direct browser access
Netlify functions can be executed directly via a URL, which means that anyone or a bot could try to run yourdomain.com/netlify/functions/deploy-succeeded.js and trigger the function. Just like any other serverless function, it can be triggered by a direct HTTP request. And this could lead to unintended consequences, such as submitting URLs to the Indexing API excessively.
We don't want that, especially because of the potential runaway costs (see the section below) so the function checks if the request is a direct browser access and blocks it with a 403 Forbidden response. This way, the function will only run when triggered by a Netlify deploy event.
The INDEX_ALL flag
If you're using this Netlify function for the first time, you might want to request indexing for all the content in your sitemap. To do this, set the INDEX_ALL flag to true in the function.
After the first run, remember to set INDEX_ALL to false to only index URLs that have been modified in the last 6 hours.
I found this solution was the simplest approach, rather than building out custom logic or some kind of database to track which URLs have been indexed.
Step 2: Install dependencies
You'll need to install a couple dependencies to use this Netlify function. Run the following command in your project directory:
npm install googleapis xml2js
Step 3: Set up Google Cloud Project and enable Indexing API
To use the Indexing API, you'll need to set up a Google Cloud Project and enable the Indexing API.
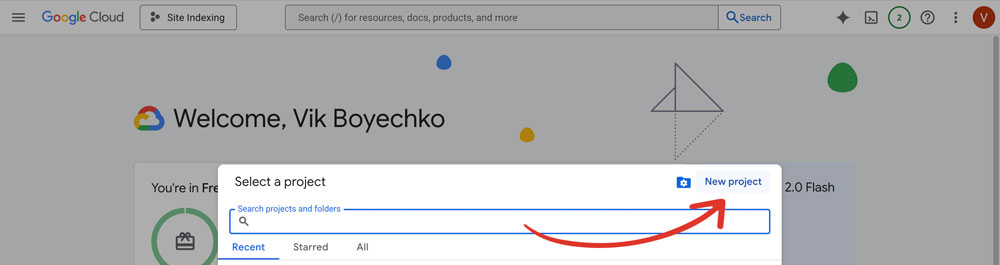
1. Go to the Google Cloud Console and create a new project
2. Create a service account and download the JSON key file
The easiest way is just to search 'service account' in the Google Cloud Console search bar, and then click on 'Create Service Account'. Give it a name, generate a service account ID, you don't need an Organization, and then click Done.
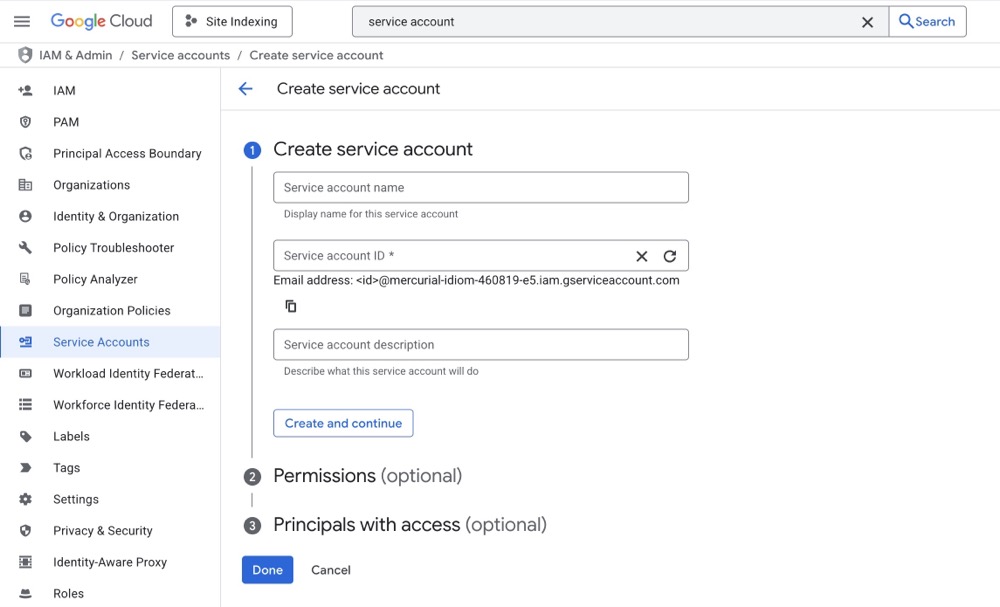
Then click on the service account you just created, and go to the 'Keys' tab. Click on 'Add Key' and then 'Create new key'. Choose JSON as the key type, and then click Create. This will download a JSON file to your computer.
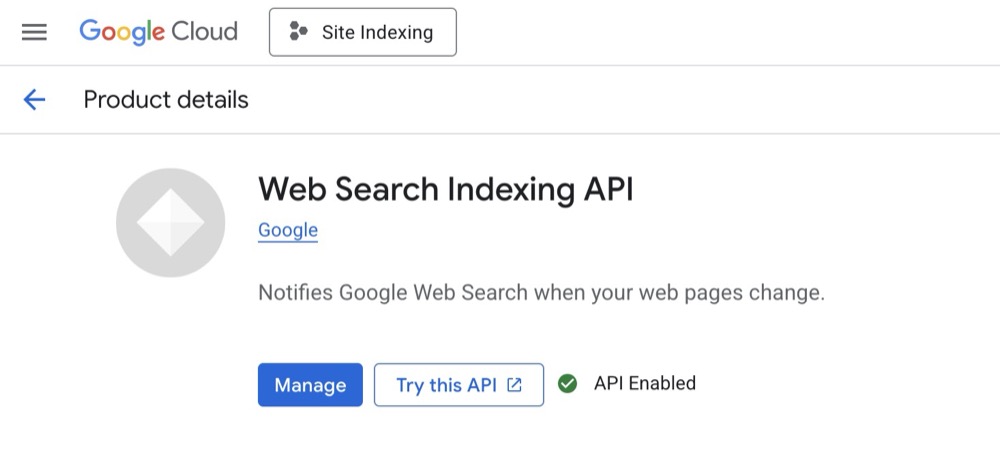
3. Enable the Indexing API for your project.
Now that you have a service account, you need to enable the Indexing API for your project. The easiest way is to search for 'Auto Indexing' in the Google Cloud Console, and and then clicking on "Enable". In my screenshot I've already enabled it, so it says 'Manage' instead.
Google Cloud Console can be just as overwhelming and confusing as the rest of Google's services. So the key is to dip in and out and not get too caught up in the details.
What about potential costs?
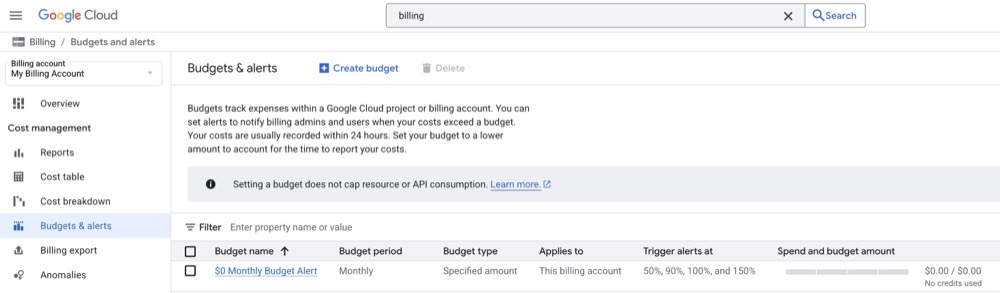
You may have heard reports of people getting charged hundreds of thousands of dollars for Google Cloud projects that racked up unplanned usage. There's a very simple solution to this, which would be a budget cap. Unfortunately, Google being Google, you can't actually set a budget cap.
So for this function, it's wise to set an alert when your usage gets close to the maximum free 200 submissions per day. You can do this in the Google Cloud Console by going to the "Billing" section, and then setting up a budget alert. This way, you'll be notified if your usage exceeds a certain threshold.
But doesn't the Indexing API have a daily limit?
Yes, the Google Indexing API does have a daily limit of 200 URL submissions per day. This is a hard limit set by Google, and if you exceed it, your requests will be rejected with a 429 error. But I prefer to err on the side of caution, why not?
This is why the function has a section to refuse direct browser access, so a bot or malicious user can't try to run yourdomain.com/netlify/functions/deploy-succeeded.js a thousand times and leave you with a hefty bill.
And I've also added a MAX_DAILY_SUBMISSIONS variable to the function that defaults to 150. This is a safety buffer below Google's 200 daily limit, but you can adjust it as needed.
Step 4: Configure environment variables
Now that you've set up the Google Cloud Project and enabled the Indexing API, you'll need to add an environment variable in your Netlify portal.
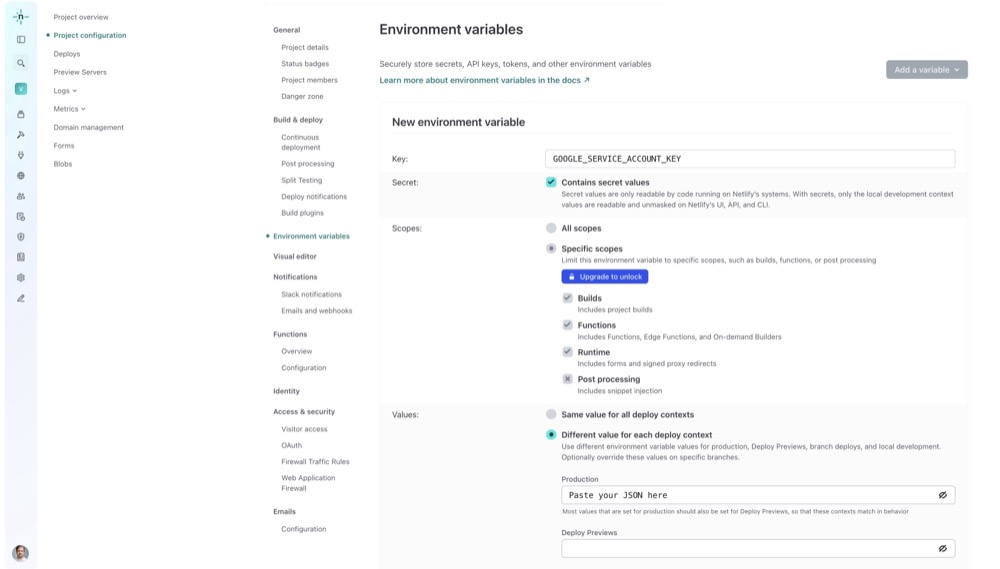
In Netlify go to 'Project configuration', then 'Environmental variables' and add a new environment variable called GOOGLE_SERVICE_ACCOUNT_KEY. Select 'Contains secret values', which will then automatically select 'Specific scopes' and 'Different value for each deploy context'. Then paste the entire contents of your service account JSON key file into the 'Production' field.
Step 5: Add the service account as a Google Search Console property owner
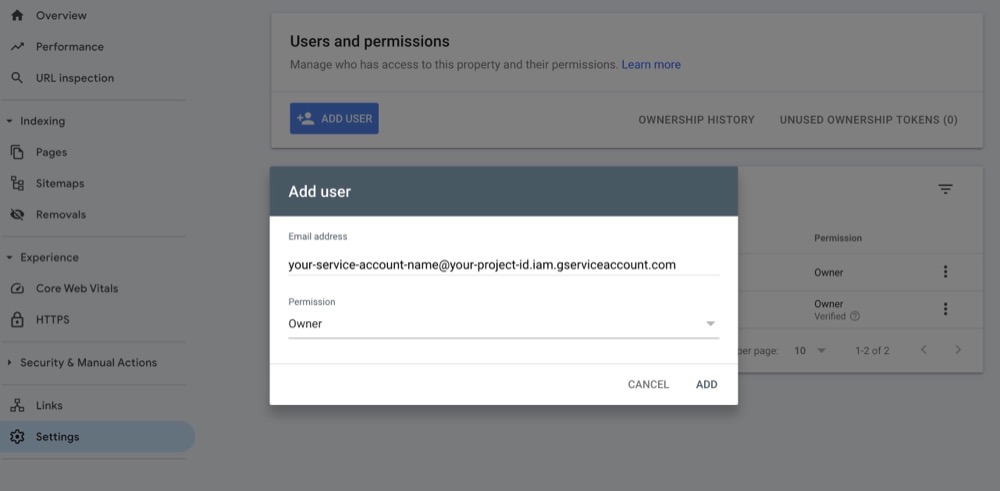
Now you'll need to login to Google Search Console, go to the specific property/site you're submitting URLs for, and then add the service account email as a property owner. This is so Google can verify that you have permission to submit URLs to the Indexing API.
You can find the service account email in the service account JSON key file, or you can find it in the Google Cloud Console under the service account. It will look something like your-service-account-name@your-project-id.iam.gserviceaccount.com.
Step 6: Test the function
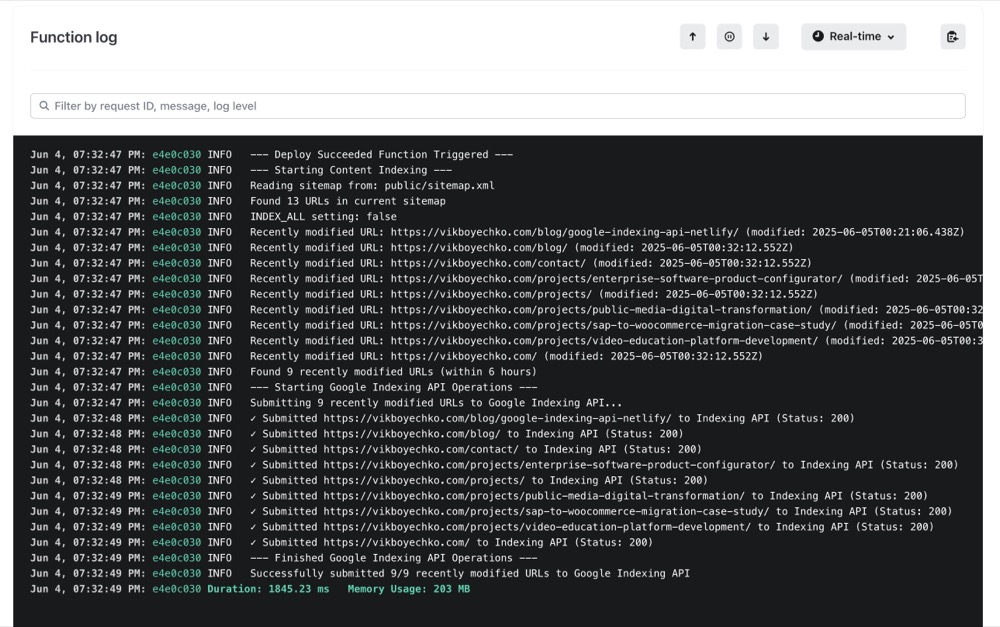
Now you're ready to test the function. You can do this by deploying your site the way you normally would. Then in Netlify, go to the Logs -> Functions tab, and click on the deploy-succeeded function. You should see the function logs to confirm that you've succesfully submitted URLs to the Indexing API.
Final thoughts
Honestly if you have an established site and you're not relying on immediate indexing for news posts, then you probably don't need to bother with this at all. Google will index your content eventually, and it's not a big deal if it takes a day or week.
But if you've got a new site, it can be frustrating to spend time creating content, checking your analytics regularly, and then going to Search Console only to find your content hasn't been indexed in weeks.
This is where I think this Netlify function can be helpful, and it's free so why not give it a try?