How to Setup an Auto Email with Free N8N and Stripe Webhooks
If you want to sell a digital product, it's not hard to set up a Stripe payment link. But what if you want to send your buyers an automatic email with the product they purchased?
Stripe does have built-in email receipts for purchases, but they don't give you much control over the content, so you can't include a download link or any other custom info.
So in this post, I'll show you how to set up a free self-hosted N8N instance that listens for Stripe webhooks and sends an email to your buyers. It's an essential step to sell your own stuff online, and honestly I was surprised that it's not already built into Stripe.
But that's ok, you're here so let's get started!
Self-Hosted N8N
N8N is an open-source (sorta) workflow automation tool that allows you to connect different services and automate tasks. It's like Zapier, but they have a free self-hosted version that you can run on your own home server.
If you don't want to self-host, N8N also has a cloud version that starts at $20/month, which is still pretty affordable, especially if you end up using it for other automated workflows. But if you want to keep costs down, self-hosting is the way to go.
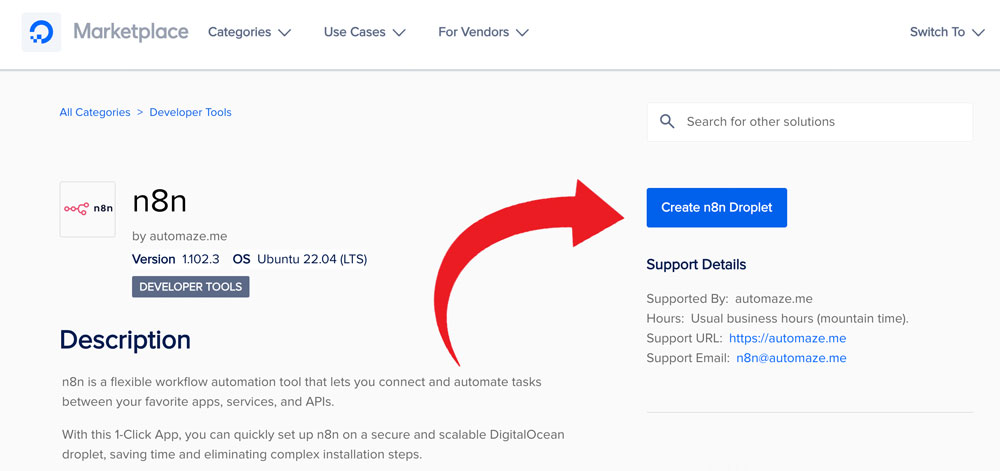
Probably the easiest way to get started with N8N is to get a Digital Ocean droplet and install it using their one-click app. You can find the N8N app in the Digital Ocean Marketplace. It'll cost $6-8/month, and you'll have a secure webhook URL that you can use with Stripe as well as any other N8N workflows you might want to create later. And you can use the droplet for other things too.
But I really like to self-host things on my own hardware, even with the downsides like power outages, more complex setup, electricity, etc. I don't see a monthly fee on my card statement each month, and so it "feels" free to me, even if the costs are hidden.
And I also like having full control over my data and services - using a home server is a great way to slowly learn about different open-source tools that are alternatives to the big cloud services.
Home Server Setup
First, if you only have one computer, know that you'll need to leave it on all the time for this to work. So alternatively, I recommend a cheap Mini PC to use as a home server - in my case an old Mac Mini because I'm a Mac guy.
In addition to running Docker Desktop on the home server, you'll also need a consistent webhook address. If you have a static IP address from your ISP already, you can certainly use that with a custom security setup. But to me the easiest way to go is to setup a Cloudflare Tunnel. It's free, secure, and all you need is a domain address you probably already have.
Cloudflare Tunnel
If you want to dive deep into home server security, there is a ton of advice on the Self Hosted Subreddit. But the learning curve is immense - even just figuring out which direction you want to go. To me, Cloudflare Tunnel is a safe bet, you don't need to expose any ports on your home network, you don't need a static IP address, and there's a mix of CLI and GUI. You just need an existing domain name that you own.
Even though your N8N webhooks have to be publicly accessible to work, you do also have the N8N authentication for the admin login, and you can setup Cloudflare to stop any repeated login attempts with rate limits. Lots of options for security out there, so try not to get too overwhelmed at first.
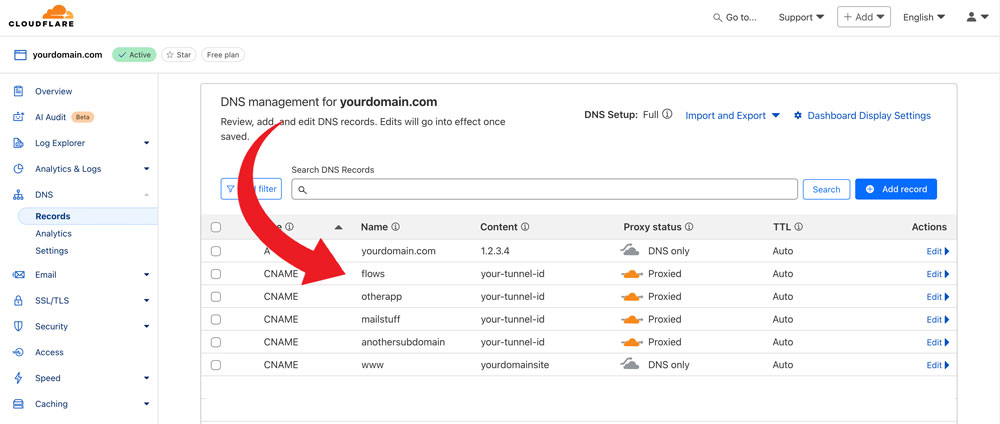
So once you have your home server setup with Docker Desktop and a Cloudflare Tunnel, you'll need a subdomain to point to your N8N instance, like flows.yourdomain.com. You can use any domain you own, and then setup a CNAME record in your DNS settings to point to the Cloudflare Tunnel address. And then you can use other subdomains for other services you want to self-host.
N8N Docker Setup
Now let's get N8N running in your Docker Desktop. Here is the official N8N Docker setup guide.
In your docker-compose.yml file, you'll want to set a few environment variables to make sure your N8N instance is secure and works with your Cloudflare Tunnel. Here's an example of what your docker-compose.yml file might look like:
version: '3'
services:
  n8n:
    image: n8nio/n8n
    restart: always
    environment:
      - N8N_HOST=flows.yourdomain.com
      - N8N_PROTOCOL=https
      - N8N_SECURE_COOKIE=true
      - N8N_BASIC_AUTH_ACTIVE=true
      - N8N_BASIC_AUTH_USER=yourusername
      - N8N_BASIC_AUTH_PASSWORD=yourpassword
      - N8N_ENCRUPTYION_KEY=yourencryptionkey
      - GENERIC_TIMEZONE=America/Chicago
      - WEBHOOK_URL=https://flows.yourdomain.com
    ports:
      - "5678:5678"
    volumes:
      - ./n8n-data:/home/node/.n8n
It's important to set the N8N_WEBHOOK_URL because if you don't, your webhooks will look like this: https://flows.yourdomain.com:5678. The port number will cause problems with Stripe and other services that expect a standard URL. So make sure to set the N8N_WEBHOOK_URL to your N8N instance URL without the port number.
The other thing to note is, if you're testing on your local network, you can set N8N_SECURE_COOKIE to false, but once you start using the Cloudflare Tunnel, you'll want to set it to true. Cloudflare will handle the SSL for you, so your N8N instance will be secure.
Add your N8N instance to Cloudflare Tunnel
Once you have your N8N instance running, you'll need to add it to your Cloudflare Tunnel. You just have to edit the config.yml file in your .cloudflared folder to point to your N8N instance. Here's an example of what your config.yml file might look like:
tunnel: your-tunnel-id
credentials-file: /path/to/your/credentials/file.json

ingress:
  - hostname: flows.yourdomain.com
    service: http://127.0.0.1:5678
  - hostname: anotherapp.yourdomain.com
    service: http://127.0.0.1:9999
  - service: http_status:404
You can add as many services as you want to your Cloudflare Tunnel, just make sure to point the hostname to the correct service running on your home server.
Now run docker compose up -d to start your N8N instance. You should be able to access it at https://flows.yourdomain.com. Make sure to log in with the username and password you set in the docker-compose.yml file.
Create a Stripe Webhook
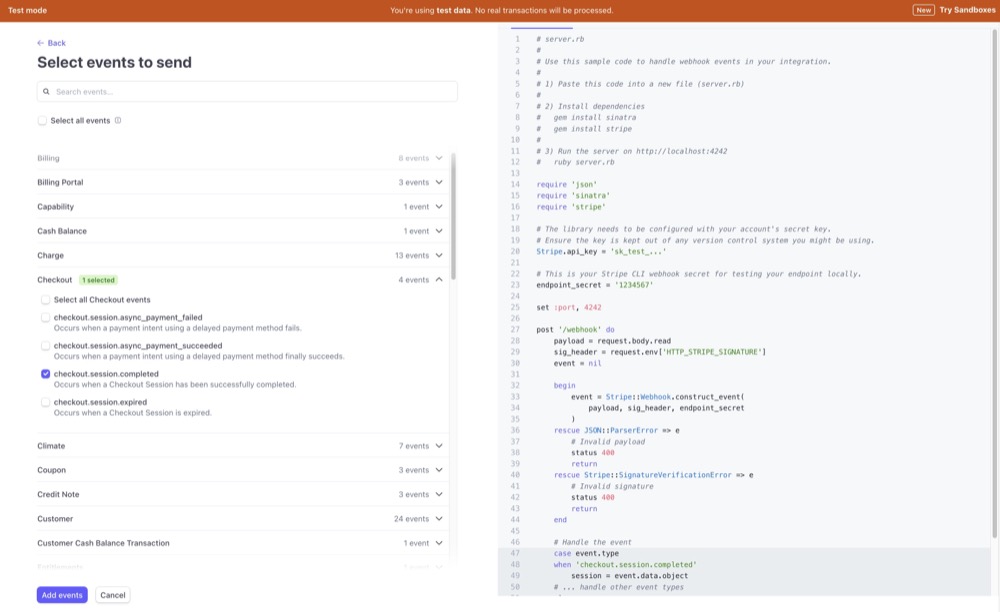
In your Stripe dashboard, go to Developers > Webhooks and click on "Add endpoint". Select the events you want to listen for, such as checkout.session.completed, and click "Add endpoint". You can also use payment_intent.succeeded if you want to listen for successful payments. Both should work, but make sure to test it out with a test payment once you have the N8N workflow set up.
In the next screen, enter your N8N webhook URL, which should be something like https://flows.yourdomain.com/webhook/stripe.
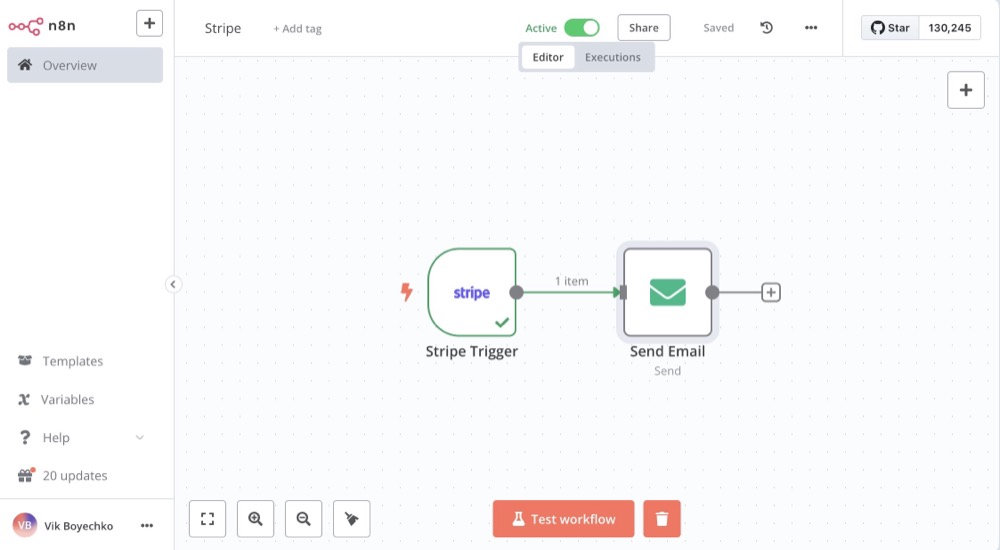
Create the N8N Workflow
Now that you have your N8N instance running, let's create a workflow that listens for Stripe webhooks and sends an email to your buyers.
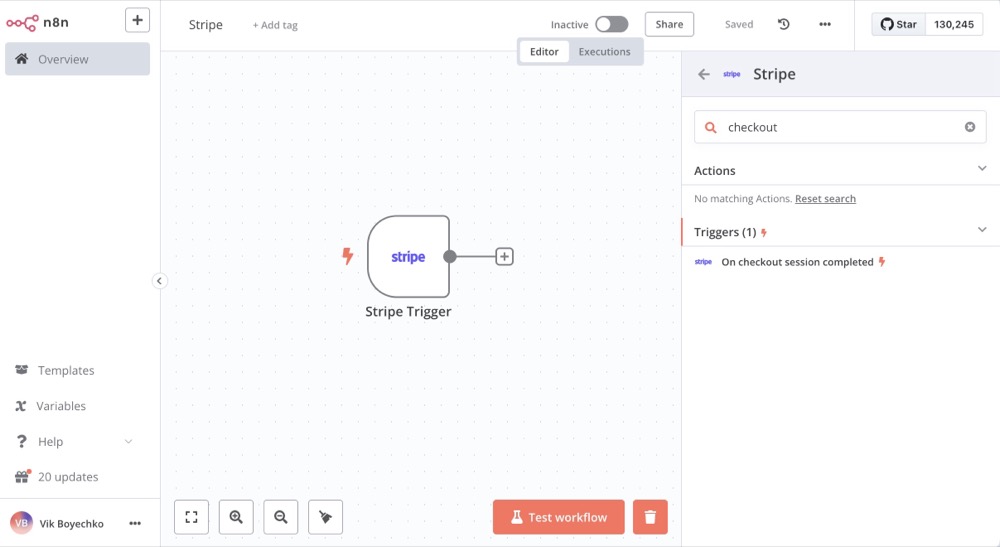
In N8N, create a new workflow and add a Stripe node. Configure the Stripe node to use your Stripe API key and set the event to checkout.session.completed. This will allow N8N to listen for when a checkout session is completed in Stripe.
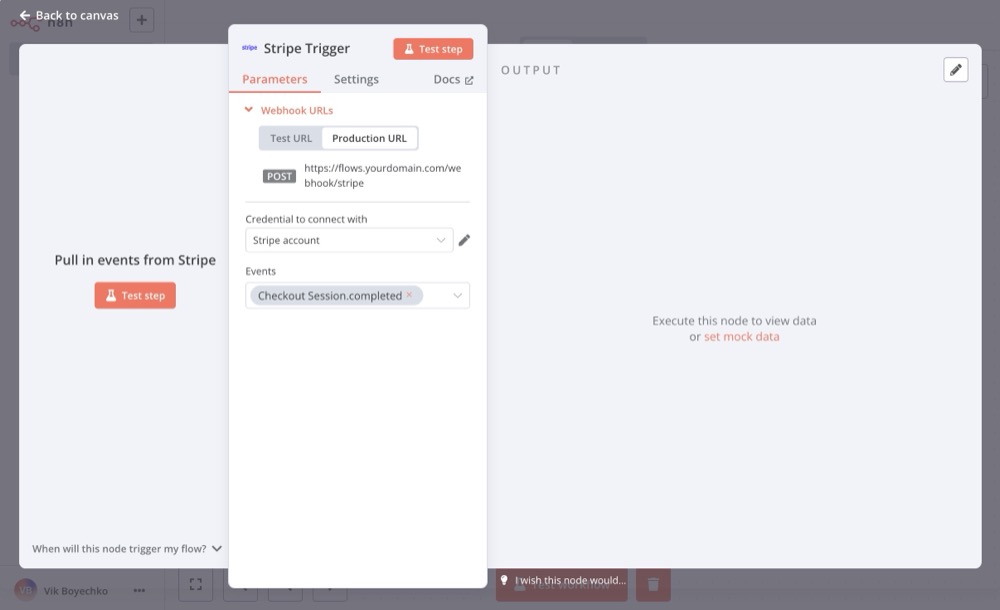
Now if you open the trigger, you'll need to create a Stripe credential, which means you'll need an API secret key. You can find your Stripe API key in the Stripe dashboard under Developers > API keys. Make sure to use the test key if you're testing with a test payment.
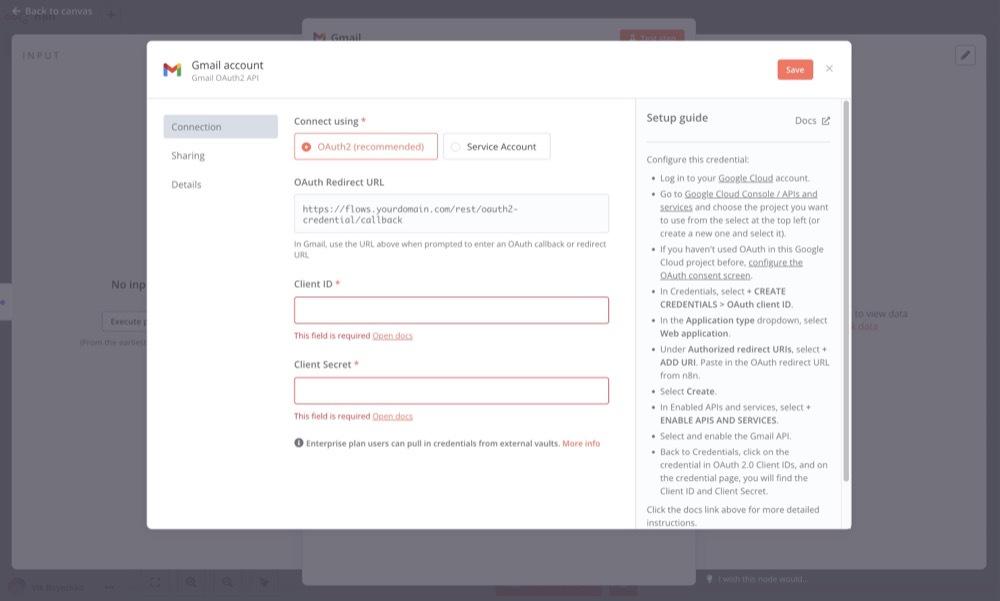
Next, add an Email node to the workflow. You can use any email service you like, but know that if you use Gmail, you'll need to follow some extra steps to allow N8N to send emails on your behalf.
This is why I personally recommend using a dedicated email service for sending emails from N8N. Then you can add an SMTP email node instead of the Gmail node. If you need a reliable mail service, I highly recommend a lifetime plan with MXRoute. That way you can easily create different addresses for different purposes, with as many domains as you want, after only paying the one-time fee.
Test with a Stripe Payment
Before you can configure the Email node with pulling in the email address from the Stripe checkout session, you'll need to test the workflow with a test payment. In Stripe test/sandbox mode, create a payment link for a product and complete a test purchase using the test card number like 4111 1111 1111 1111.
First, in N8N, open the Stripe Trigger node and click 'Test Step'. This will put the node in listening mode, waiting for a webhook to be received. Then, complete the test payment in Stripe. You can use any email address you want for the test purchase, but make sure to use a valid email address that you can access.
Once the test payment is complete, go back to your N8N workflow and check the Stripe node. You should see the data from the test payment, including the email address of the buyer.
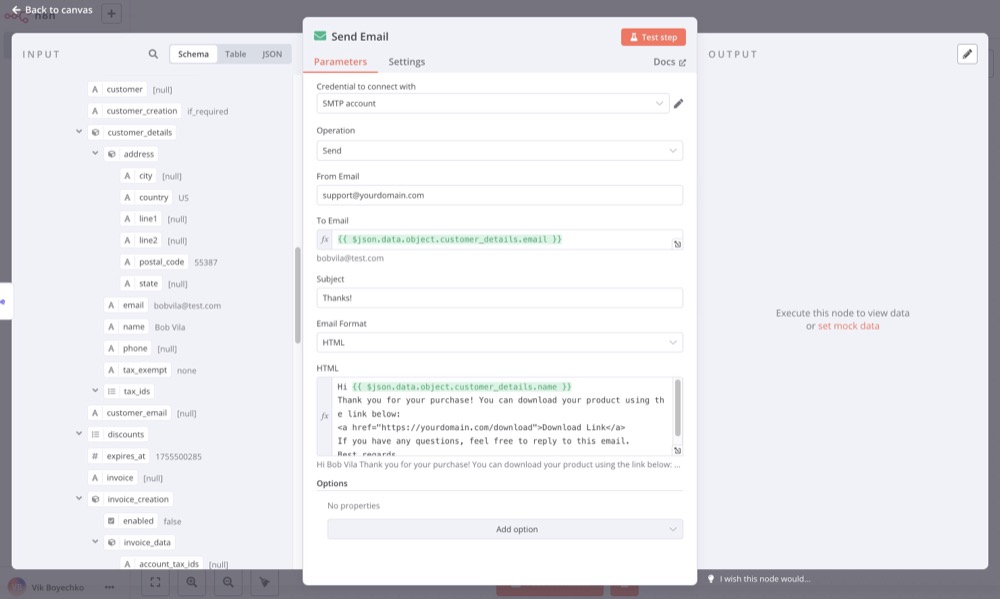
Configure the email node with your credentials and set the 'To' field to the email address from the Stripe checkout session. You can use the expression editor to pull in the email address from the Stripe node - just drag the email field from the Stripe node into the 'To' field of the Email node.
In the Email node, you can customize the subject and body of the email with HTML and the dynamic expressions (variables from Stripe). You can include a download link or any other information you want to send to your buyers. Here's an example of what the email body might look like:
Hi (name),

Thank you for your purchase! You can download your product using the link below:
<a href="https://yourdomain.com/download">Download Link</a>

If you have any questions, feel free to reply to this email.

Best regards,
Your Name
Finally, save the workflow and activate it to start listening for Stripe webhooks. Make sure you've switched everything from test mode to production mode in both Stripe and N8N, such as the webhook URL and the Stripe credentials.
Now, when someone makes a purchase using your Stripe payment link, N8N will automatically send them an email with the download link or any other information you included in the email body.
Conclusion
Setting up an automatic email with N8N and Stripe webhooks is a great way to enhance your digital product sales. You have full control over the content of the email, and you can customize it to fit your brand and product. Plus, self-hosting N8N gives you the flexibility to create other workflows and automations in the future.
For example, if you want to send a follow-up email to your buyers after a certain period of time, you can create another N8N workflow that listens for the email sent event and triggers a follow-up email. Or you can create a workflow that adds your buyers to a mailing list or CRM system, or an Airtable database, for example.
You can also use an AI agent to help analyze the data from your Stripe payments and create reports or insights about your sales. Since you already have N8N set up, you can easily add new workflows and nodes and start to expand your automation capabilities.