My easy zip code distance calculator app - for WooCommerce table rate shipping
If you need to get the distance in miles from your location to every zip code in the US, plus the corresponding shipping zone, this little generator might save you a ton of time.
When I was working on a WooCommerce enterprise project, I had to find a way to import a matrix of thousands of freight costs per service level, package weight, and shipping zone. This was way more than WooCommerce could provide out of the box.
Luckily I found one brilliant plugin that enables importing a shipping rate table by weight - WooCommerce Table Rate Shipping Pro - so now I would only need to find a way to populate the demo CSV and import everything and be done, yea?
But wait, if a customer enters a ship-to address in the Woo cart, how would I know what shipping zone to assign them to? There are many websites out there that give you the USPS/UPS/Fedex shipping zone from one zip code to another, but how to do this for tens of thousands of zip codes?
Zip Code Distance Calculator with Shipping Zones
So here's a handy little CSV generator I created, I hope it helps you out. Just enter your ship-from zip code, and it'll give you a download link to a generated CSV.
By default, the CSV is sorted by distance, so it starts with your own zip code as the ship-to distance, and then it keeps going until every US zip code is calculated.
And as a bonus, the right column has the shipping zone for that distance, from Zone 1 to 8. I explain more below, but first give this a try so you can follow along.
How Does It Work?
If you're curious how this little app works, here's a rundown. The first and really important step is to get the most up-to-date list of US zip codes with their geo coordinates. I found the best source (and free) is GeoNames. They source and update the list from a wide variety of sources.
GeoNames provides a zip file for all the US postal codes and their geo coordinates on their download server. The file we want is US.zip. After you unzip it, you get a text file with over 41,000 records. Here's what it looks like.

So now that we have this list, the script will parse it and add a header and three additional columns. This will prepare us for calculating distances and populating these columns. Here's what the cleaned up list looks like.

Haversine Formula
To calculate the distance between two geo coordinates, we use the Haversine Formula which was published by James Inman in 1835. It calculates the great-circle distance between two points on a sphere (Earth).
function calculateDistanceBetweenPoints(lat2, lon2, fromLat, fromLng) {
  const R = 3958.8; // Radius of the earth in miles
  const lat1 = fromLat; // Latitude of the starting point
  const lon1 = fromLng; // Longitude of the starting point
  const dLat = deg2rad(lat2 - lat1);
  const dLon = deg2rad(lon2 - lon1);
  const a =
    Math.sin(dLat / 2) * Math.sin(dLat / 2) +
    Math.cos(deg2rad(lat1)) * Math.cos(deg2rad(lat2)) * Math.sin(dLon / 2) * Math.sin(dLon / 2);
  const c = 2 * Math.atan2(Math.sqrt(a), Math.sqrt(1 - a));
  const distance = R * c; // Distance in miles
  return distance.toFixed(2); // Round to 2 decimal places
}

function deg2rad(deg) {
  return deg * (Math.PI / 180);
}
Shipping Zones
Now all there is left to do is figure out the shipping zone for each distance. Shipping Zones are used by USPS, UPS, and Fedex to calculate the estimate delivery time and cost. Here's a basic chart of the zones, based on the distance between the ship-from and ship-to locations.
Shipping Zone Mile Radius (from origin)
- Zone 1: 50 mile radius
- Zone 2: 51 – 150 mile radius
- Zone 3: 151 – 300 mile radius
- Zone 4: 301 – 600 mile radius
- Zone 5: 601 – 1000 mile radius
- Zone 6: 1001 – 1400 mile radius
- Zone 7: 1401 – 1800 mile radius
- Zone 8: 1801+ mile radius
The script represents this chart fairly simply:
function categorizeZone(distance) {
  if (distance >= 0 && distance <= 50) return 1;
  else if (distance <= 150) return 2;
  else if (distance <= 300) return 3;
  else if (distance <= 600) return 4;
  else if (distance <= 1000) return 5;
  else if (distance <= 1400) return 6;
  else if (distance <= 1800) return 7;
  else return 8;
}
The End Result
So now we just need to create the new CSV and provide a download link. The end result looks like this (if the zip code entered is 90210).
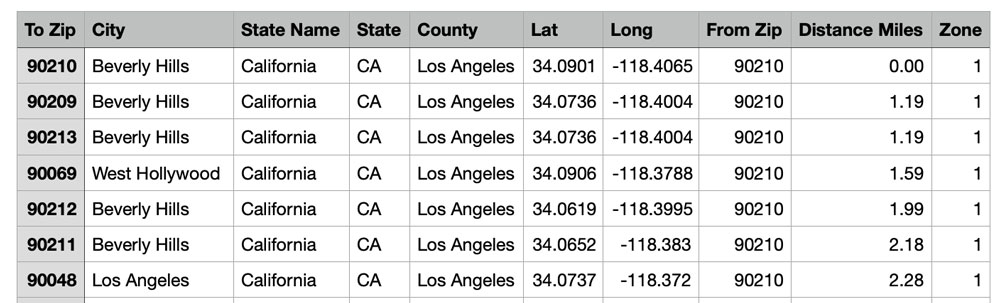
You can checkout the github repo if you'd like to run this locally.
How to import these shipping zones into WooCommerce Table Rate Pro
If you're still here and specifically looking for how to use this CSV for your WooCommerce table rate shipping setup, read on.
I used my little app above to create Woo shipping rates for 8 zones and 2 shipping service levels - standard and overnight - both with specific breakdowns based on package weight. But your needs may be different so you'll have to adapt.
Step 1. Create 8 shipping zones
In WooCommerce -> Shipping, you'll need to create 8 shipping zones, plus any other specific zones you might service. Then go into each shipping zone. For example, here is an Alaska/Hawaii zone.
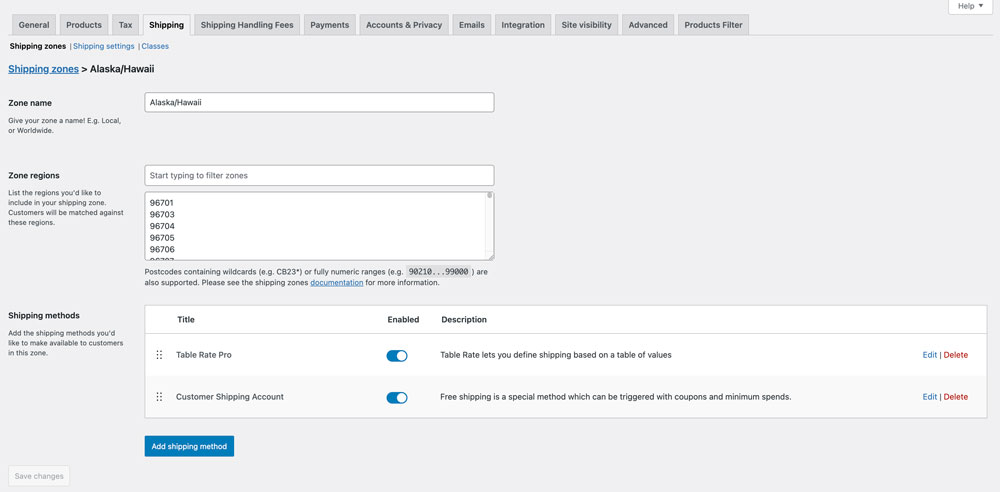
Step 2. Copy and paste all the zip codes from the CSV for that zone
In your generated CSV, copy all the zip codes from this particular zone, and paste them into the Zone regions textarea.
At this point if you want to apply a standard rate for each zone, or add some custom rates, you can work within each shipping zone and do that manually. But if you have a spreadsheet of many rates based on weight, for example, read on.
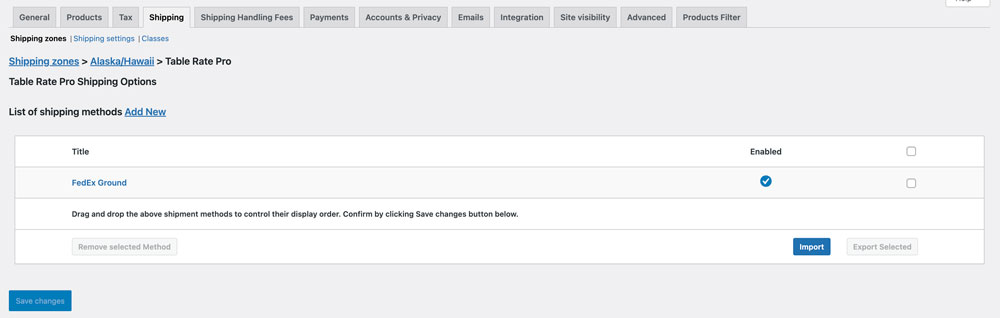
Step 3. Add Table Rate Pro shipping method
Now this is assuming you already have purchased a Table Rate Pro license. It's an annual renewal, too, so if you find in a year you've lost all your shipping methods, check your license renewal.
You might have other shipping methods such as Free Shipping or custom methods here, too.
Step 4. Add a shipping method for each service level
Inside Table Rate Pro shipping options, you'll want to ensure you separate your service level ratings into their own methods. Once You've created a new one, you can now go back to this screen and select Import.
Step 5. Import your shipping rate table
Now you can import a CSV and let this plugin do its magic. It's important to use the same headers that the upload expects. Here's a demo from Table Rate Shipping Pro. You can also refer to the manual here.

Step 6. That's it!
Now you're all set. You've imported rates for a particular shipping zone and service level, and you just saved yourself the painstaking process of doing it all manually. Plus, if your rates change, you can just run the import again.
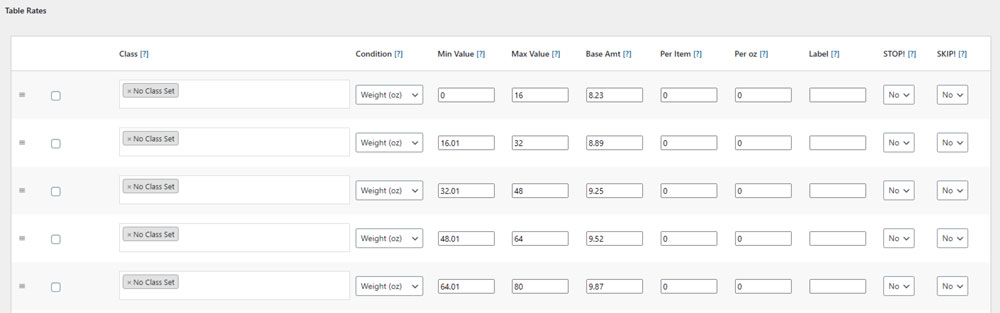
Here's what the table rate should look like:
If you're building out a WooCommerce store, you might also want to set up automatic buyer emails with N8N and Stripe webhooks.