CloudCannon Review: The Best Visual CMS for Static Sites
When it comes to building a website, to me there is nothing better than a static site with a lightweight CMS. You design it with HTML, CSS, and a bit of JavaScript, you add a static site builder like 11ty, create some base templates for the header and footer, and call it done.
But even a static site needs some dynamic content, like a blog, or events, so you need a CMS that creates markdown files with some front matter, and the static site builder will take care of generating the html at build time.
You can host it for free at Cloudflare or Netlify by connecting it to your Github repo, and the lightweight CMS takes care of the commits and automatic deploys. This is the beauty of headless CMS, or Jamstack - you design the CMS to be the most user-friendly content management UI for your non-technical users, exposing them to only what they need to change and nothing more.
As a developer, this is pure joy, no matter what stack you pick: Astro, 11ty, Hugo, Jekyll, Gatsby, the list goes on. They are perfect for small businesses or organizations, require no hosting fees, and best of all no vendor lock-in.

But if you've ever tried to present this option to a client, it's almost guaranteed they will ask how they can make edits, preferably with a visual layout.
You tell them it's quicker and cheaper for you to swap some images or change the text yourself, rather than implement a sophisticated CMS with a visual builder. You tell them in your experience clients almost always are too busy to make their own edits and would rather just shoot a request to a developer. But then they say, well Wordpress allows us to edit. Can't we use that? facepalm
So rather than trying to argue with a client, here's an easy solution: CloudCannon. In this article I will show you how easy it is to migrate your static site into CloudCannon, which I think is a really good best of both worlds CMS. You keep your developer-friendly Jamstack site, and your client gets a user-friendly CMS with visual editing for only the elements you want them to edit.
Best of all, you don't have to switch from a simple static site to a sophisticated React-based site with JSX components, props, a database, and complex developer workflows. You can keep your simple static site, and just add a few data attributes to make elements visually editable in CloudCannon. It's really that easy.
Getting Started with CloudCannon and Eleventy
To help you get started with CloudCannon, I've forked the popular Codestitch Intermediate Website Kit (Less version) and converted it to a CloudCannon project. You can find it here: Codestitch CloudCannon Starter on GitHub.
Codestitch has been instrumental in bringing back the simple joys of static sites for a lot of newbie and experienced web developers. There are a ton of premade elements with HTML and CSS (or in this case, the Less preprocessor), and you just drop them into an HTML page and edit the contents. Everything is already responsive ready.
I used an older version of this Codestitch kit to build this site and I really love it. The 11ty static site generator, with Nunjucks templating, and the lightweight Decap CMS (formerly Netlify CMS) couldn't get any easier.
So I thought this would be a great demo project to convert over to CloudCannon. Ryan from Codestitch has been somewhat of a static site evangelist on the /r/webdev subreddit, and he has insisted many times that his clients have never wanted to edit the content themselves. The 'unlimited edits' monthly subscription takes care of that itch, and most clients don't have that much they want to edit anyway.
But the Codestitch discord and subreddit has seen more than a few people ask about visual editing options for clients who want it, and this is where CloudCannon is clutch. So let's get started.
How to Import a Static Site into CloudCannon
You can start a free trial of CloudCannon and begin playing around with the UI, or you can read their documentation first. They recently updated all the documentation and I have to say, the team at CloudCannon is exceptionally good at onboarding new users. They guide you along when you create a new site, so to me I think it's easier to just dive right in and then refer to the docs as you learn the platform.
Step 1. Create a Site
Once you have the Codestitch CloudCannon repo up on your own github, go to CloudCannon and create a site. Choose your GitHub repository. You will need to configure the GitHub app to connect to CloudCannon.
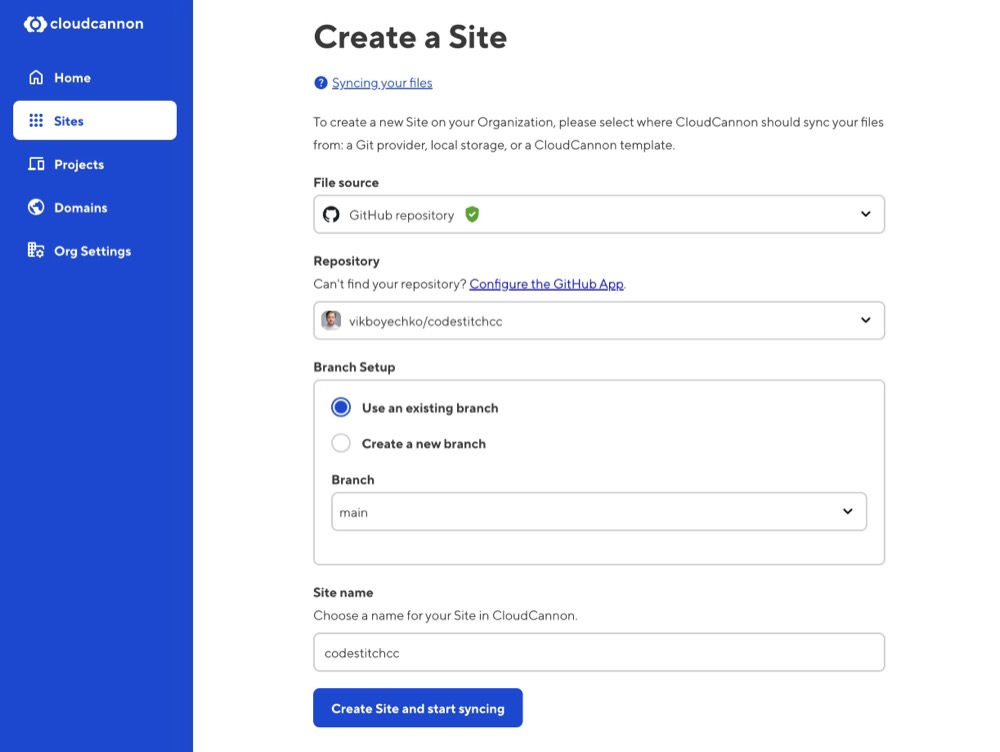
CloudCannon will start syncing everything and give you a really nice step by step guide. Honestly they really have made the UX so good, the product managers at CloudCannon must be really in tune with the user journey.
I may be gushing but most content management systems have a steep learning curve when you first start diving in, even if you're familiar with the tech stack and headless CMS essentials like collections and schemas. So CloudCannon has done a great job at hand holding new users through learning their platform.
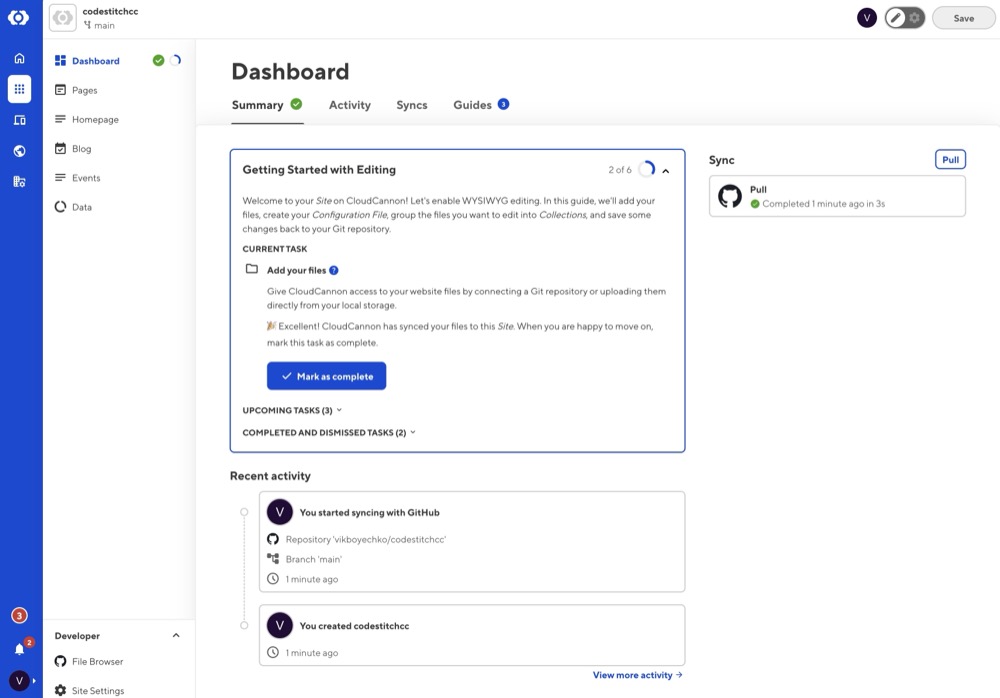
Since this demo static site has everything already setup, when you connect the repo CloudCannon doesn't need to do anything to migrate your site. So you can click through the 'Next' steps until you get to the end.
But if you were starting with an existing static site, CloudCannon can create all the collections, the config file, and guide you through the migration. They also offer paid assistance if you are bringing in a complex website into CloudCannon.
Step 2. Set Up Visual Editing and Configure Your Build
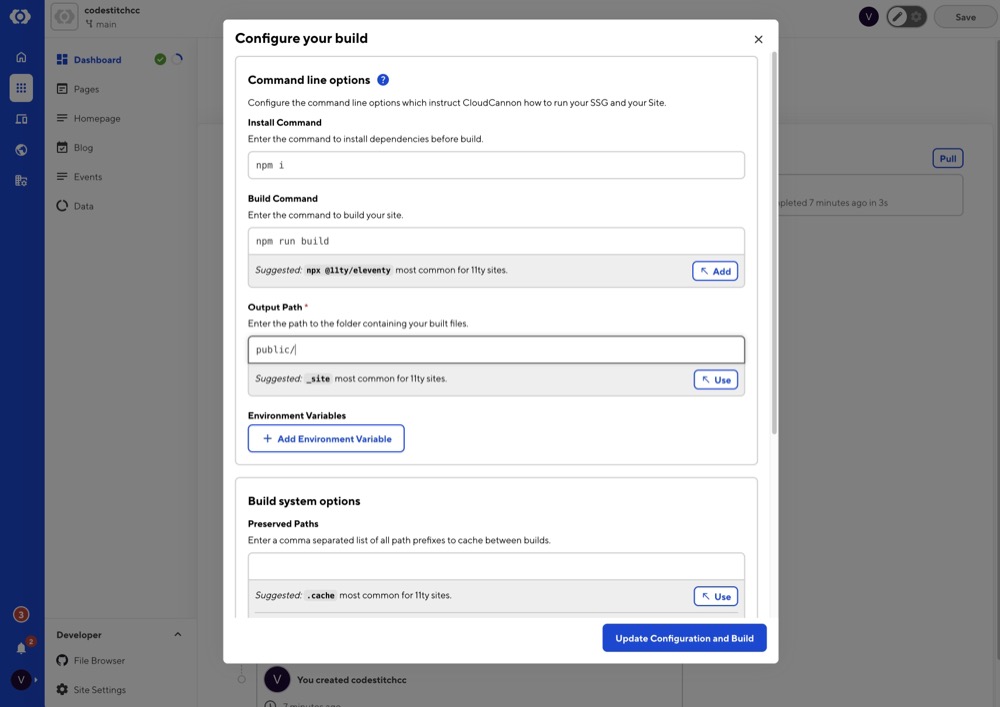
Go to the Guides tab and you'll see Set Up Visual Editing has some steps to go. Since the demo site already has visual editing enabled in the pages and homepage, all you'll need to do is configure your build settings.
When you go to configure your build, you'll see that CloudCannon already has suggestions for your install command, build command, and output path. How cool is that? Just click 'Use' on the correct scripts, and you'll be ready to go in seconds.
Hosting the site in CloudCannon or Netlify
By default, CloudCannon hosts your website and assigns you a URL. You can then configure your DNS nameservers to point to CloudCannon, which gives you a generous amount of bandwidth per month for hosting.
But if you want to use Netlify, you can easily do that just like the original Codestitch website kit recommends. Netlify will watch your repo and deploy automatically anytime there are changes, publishing everything inside the /public folder. Here's some more info on how to set up Netlify with CloudCannon.
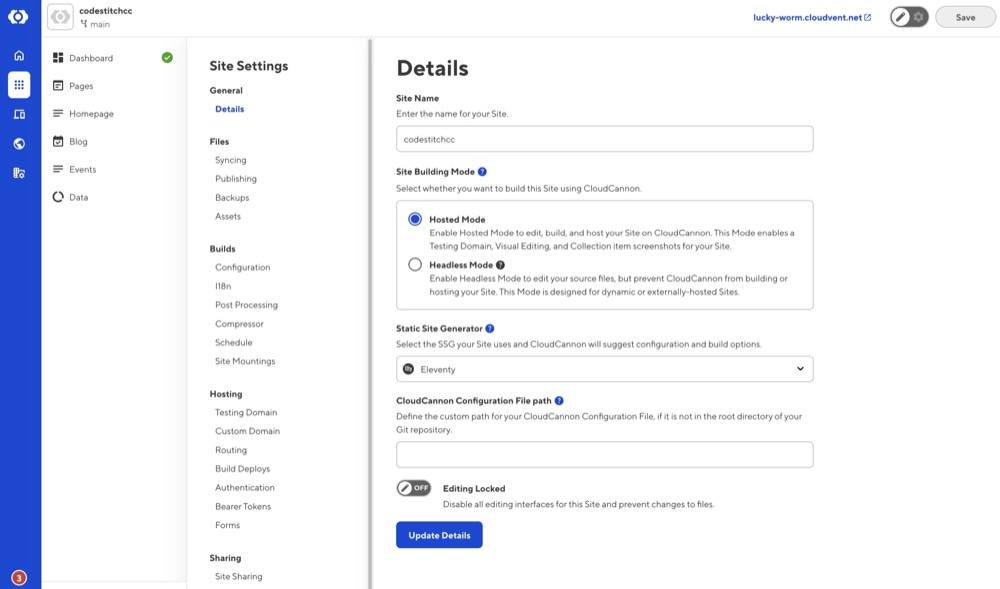
In CloudCannon, you can go into your site settings and switch from Hosted Mode to Headless Mode, which will allow CloudCannon to serve as your CMS while another service like Netlify builds and hosts your site. But there could be limitations to the content preview and visual editing if you use Headless Mode.
So I would recommend just keeping the Hosted Mode, and keep using CloudCannon's Testing Domain, while utilizing Netlify's excellent CDN and built-in forms to serve the site to the public. But it's up to you, and CloudCannon provides a guide for setting up CloudCannon as your DNS.
Visual Editing for Your Static Site
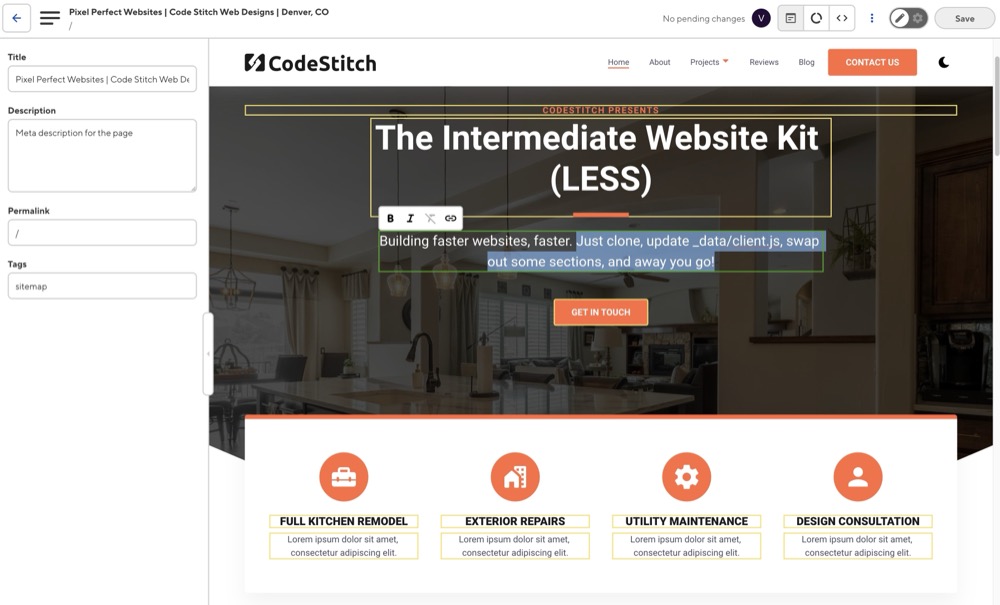
So now that your site is live, you can now go into the pages to see what visual editing looks like. Go to the Pages or Homepage collection and open up a page. You'll see that both text elements and images are easily editable.
When you edit a text element, you get some standard text options like bold, italic, and link text. If you add a line break, then at build time CloudCannon will add a
tag.
Keep in mind that nearly everything is customizable if you're motivated, so you could even decide what options your non-technical client user has when they edit text. But for a simple visual editor, for text elements you've already designed in a static site, I think this works great.
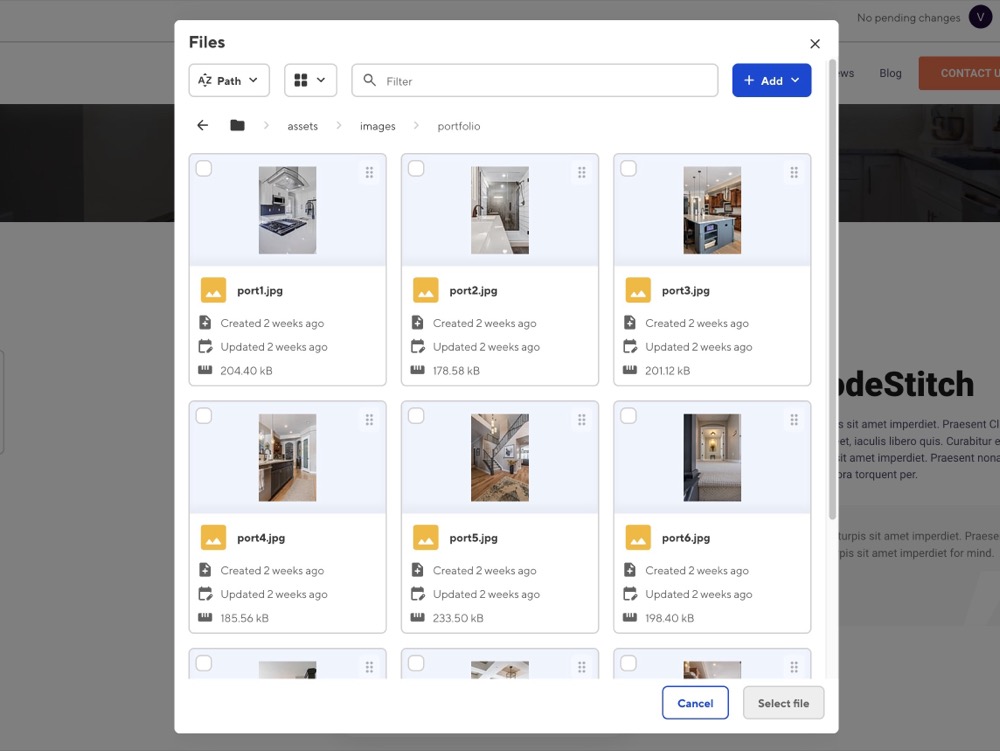
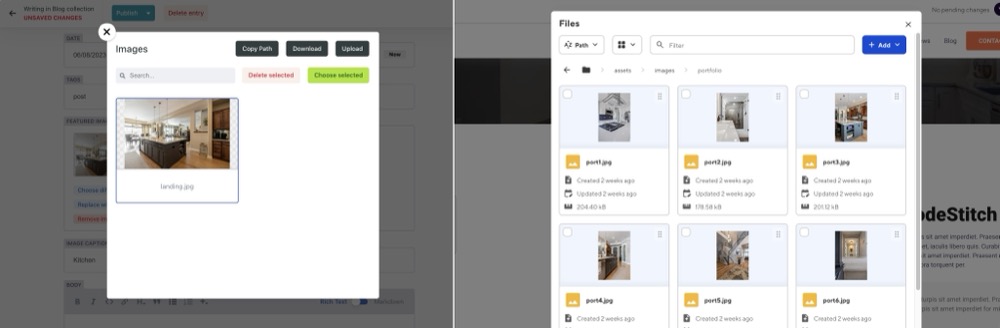
To edit an image (that has been designated as editable), you simply click on an image and you can swap it out with a new image, and edit the image alt tag.
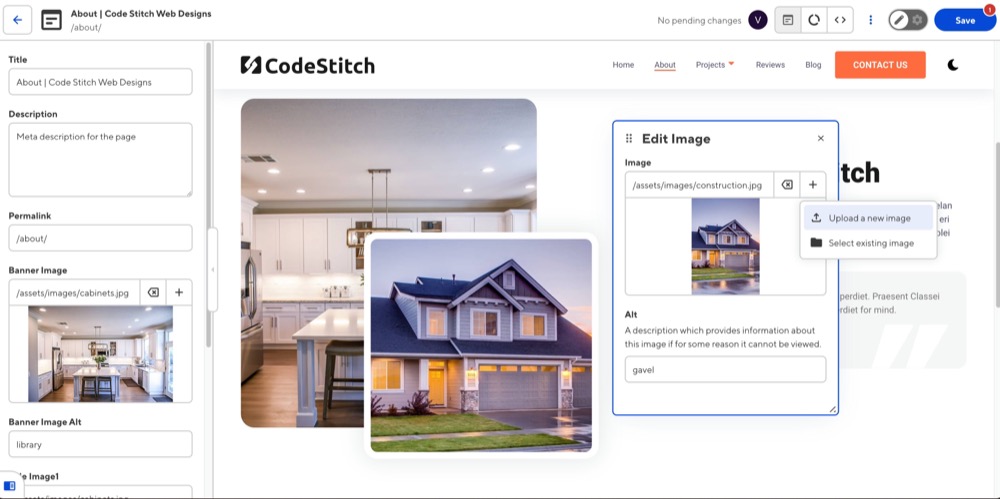
You can upload a new image or pick from existing images in your project. The image picker is super intuitive and easy to use, and having worked with lots of non-technical CMS users over the years, images can be a huge pain point. So big win for CloudCannon here.
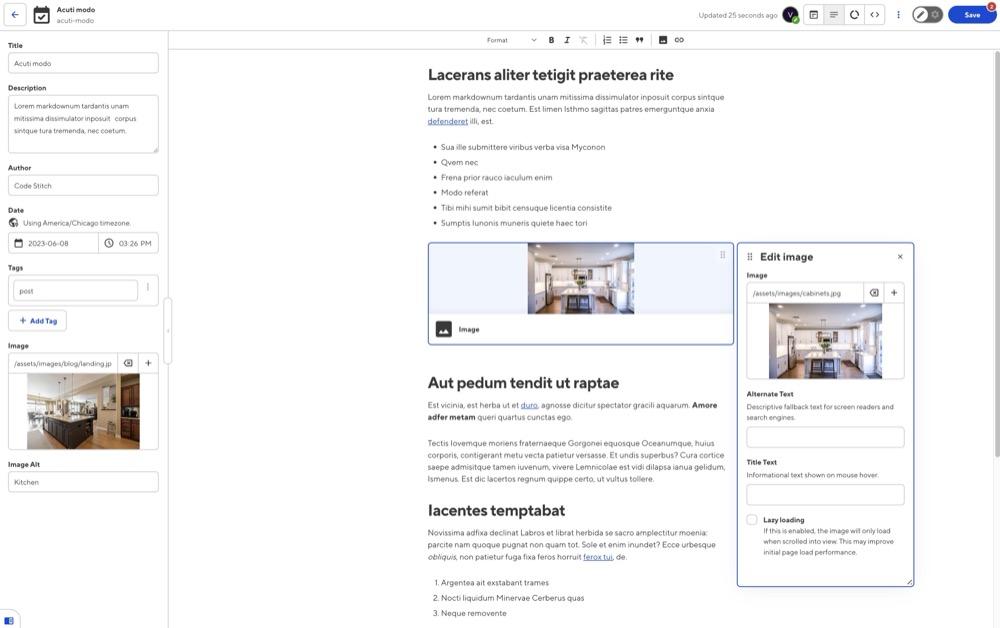
Finally, you'll notice that in the top part of CloudCannon you can switch between the Visual Editor, Data Editor, or Source Editor. This is a handy feature for not only developers but also CMS users who want to peek behind the curtains and see how a page is coded. Maybe there are some elements that you haven't made visually editable, but you or another user want to quickly change.
How to Make Elements Visually Editable
So now that you've played around with the CloudCannon visual editor a little bit, how do you actually make an element visually editable?
This is where I think CloudCannon gets it right. You don't need to convert your static HTML to React JSX components like many other CMS's require. You can just add a few data attributes to your existing HTML elements, and CloudCannon will know to make them visually editable.
Source Editable Region
The first way to make some text visually editable is add this to the element: data-editable="source" data-path="/path/to/this/page.html" data-key="name-this-element"
What this does is first tell CloudCannon that this element is editable, but the data is not being stored in the front matter, but rather in the source HTML file itself. Basically it's a quick way to make an element editable without doing anything else. The data-path attribute tells CloudCannon where to find the source HTML file, and the data-key attribute is just a unique identifier for this element.
For example, in the Codestitch homepage, here is the original HTML for the hero section:
<section id="hero-143">
  <div class="cs-container">
    <span class="cs-topper">CodeStitch Presents</span>
    <h1 class="cs-title">The Intermediate Website Kit (LESS)</h1>
    <p class="cs-text">
      Building faster websites, faster. Just clone, update _data/client.js, swap
      out some sections, and away you go!
    </p>
    <a href="/contact/" class="cs-button-solid">Get in Touch</a>
  </div>
</section>
And now here is the same section with the data attributes added to make it visually editable:
<section id="hero-143">
  <div class="cs-container">
    <span
      class="cs-topper"
      data-editable="source"
      data-path="src/index.html"
      data-key="hero-topper"
      >CodeStitch Presents</span
    >
    <h1
      class="cs-title"
      data-editable="source"
      data-path="src/index.html"
      data-key="hero-title"
    >
      The Intermediate Website Kit (LESS)
    </h1>
    <p
      class="cs-text"
      data-editable="source"
      data-path="src/index.html"
      data-key="hero-text"
    >
      Building faster websites, faster. Just clone, update _data/client.js, swap
      out some sections, and away you go!
    </p>
    <a
      href="/contact/"
      class="cs-button-solid"
      data-editable="source"
      data-path="src/index.html"
      data-key="hero-button"
      >Get in Touch</a
    >
  </div>
</section>
Text Editable Regions
The second way to make text visually editable is to use the data-editable="text" attribute. This is a more structured way to make text editable, and it uses the front matter of the page for the key value pairs. And then you would use your templating language (like Nunjucks in this example) to pull the values from the front matter and place them in the HTML.
For example, here is the same hero section with the data-editable="text" attribute added:
<section id="hero-143">
  <div class="cs-container">
    <span class="cs-topper" data-editable="text" data-key="hero-topper"
      >{{ page.data.hero-topper }}</span
    >
    <h1 class="cs-title" data-editable="text" data-key="hero-title">
      {{ page.data.hero-title }}
    </h1>
    <p class="cs-text" data-editable="text" data-key="hero-text">
      {{ page.data.hero-text }}
    </p>
    <a
      href="/contact/"
      class="cs-button-solid"
      data-editable="text"
      data-key="hero-button"
      >{{ page.data.hero-button }}</a
    >
  </div>
</section>
Then in the front matter of the page, you would add a key value pair like this:
hero-topper: "CodeStitch Presents"
hero-title: "The Intermediate Website Kit (LESS)"
hero-text: "Building faster websites, faster. Just clone, update _data/client.js, swap out some sections, and away you go!"
hero-button: "Get in Touch"
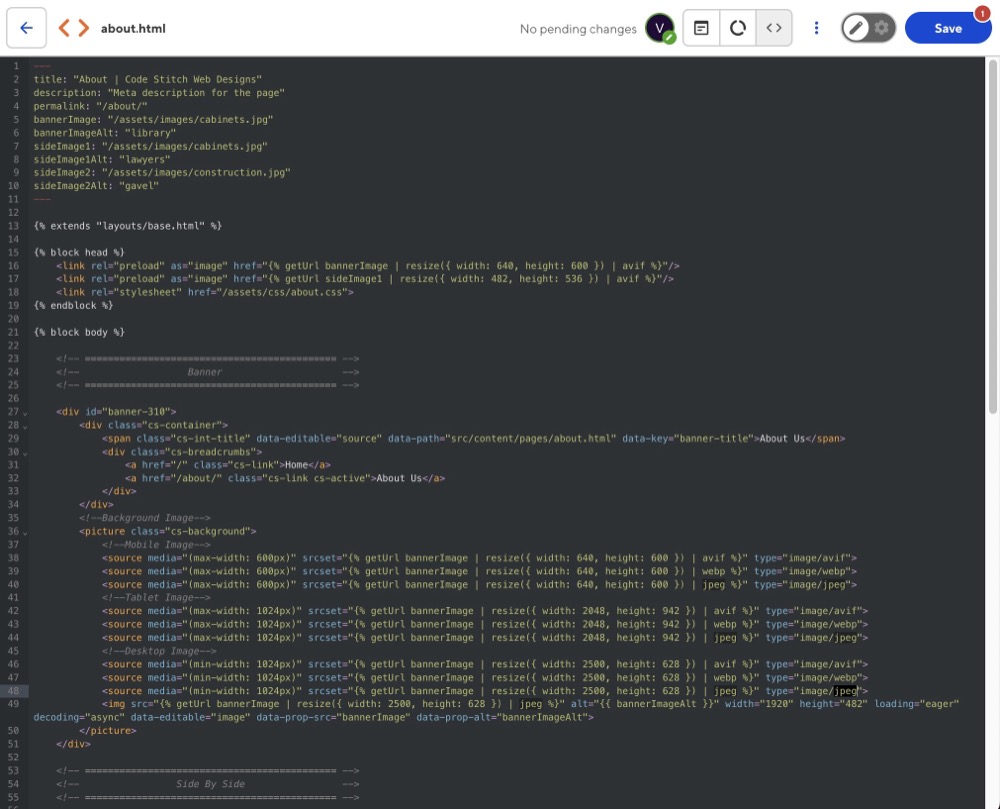
Image Editable Regions
To make an image visually editable, you can use the data-editable="image" attribute. This works similarly to the text editable regions, in that you need to have a key value pair in the front matter for the image URL, and then use your templating language to pull the value from the front matter and place it in the src attribute of the img tag.
For example, here is the start of original hero image section on a page, with the image URL hard coded in the src attribute:
<!--Background Image-->
<picture class="cs-background">
  <!--Mobile Image-->
  <source media="(max-width: 600px)" srcset="{% getUrl
  "/assets/images/cabinets.jpg" | resize({ width: 640, height: 600 }) | avif %}"
  type="image/avif"> <source media="(max-width: 600px)" srcset="{% getUrl
  "/assets/images/cabinets.jpg" | resize({ width: 640, height: 600 }) | webp %}"
  type="image/webp"> <source media="(max-width: 600px)" srcset="{% getUrl
  "/assets/images/cabinets.jpg" | resize({ width: 640, height: 600 }) | jpeg %}"
  type="image/jpeg"></picture
>
And here is the same section with the data-editable="image" attribute added:
<!--Background Image-->
<picture class="cs-background">
  <!--Mobile Image-->
  <source
    media="(max-width: 600px)"
    srcset="{% getUrl bannerImage | resize({ width: 640, height: 600 }) | avif %}"
    type="image/avif" />
  <source
    media="(max-width: 600px)"
    srcset="{% getUrl bannerImage | resize({ width: 640, height: 600 }) | webp %}"
    type="image/webp" />
  <source
    media="(max-width: 600px)"
    srcset="{% getUrl bannerImage | resize({ width: 640, height: 600 }) | jpeg %}"
    type="image/jpeg"
/></picture>
Then in the front matter of the page, you would add a key value pair like this:
bannerImage: "/assets/images/cabinets.jpg"
There are more ways to make elements visually editable, including arrays and components. CloudCannon has great documentation on setting up visual editing, but I think playing around with a site inside of the UI is the best way to learn how it works.
And remember, you don't have to make everything visually editable. That's the beauty of this CMS. You still have your static site, you can still edit the source code and markdown files directly, but now you can choose to make only certain elements visually editable for your non-technical users.
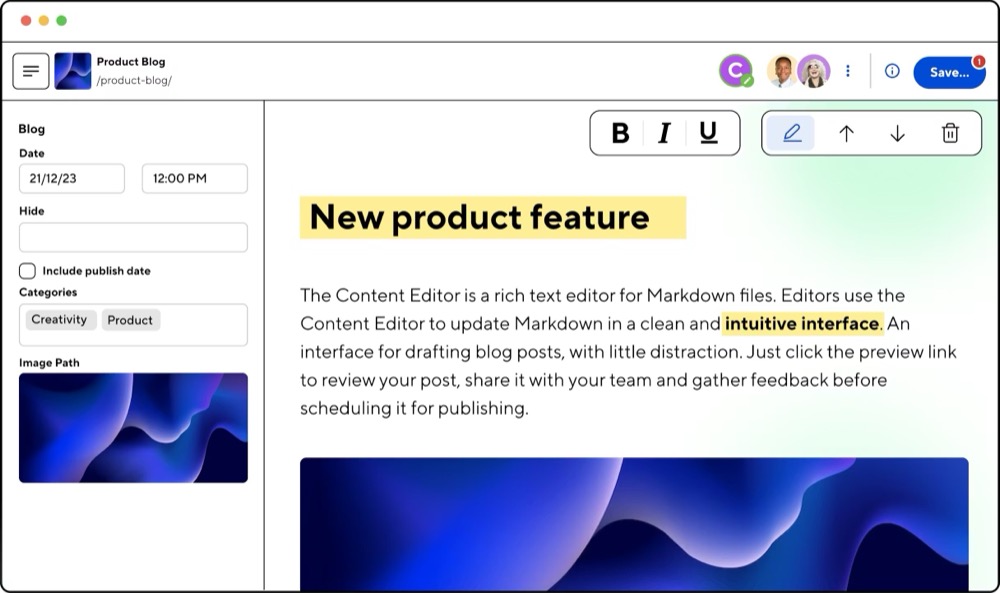
The CloudCannon Blog Editor vs Decap CMS
Another good reason to switch to CloudCannon from the default Decap CMS that comes with the Codestitch website kit, is that CloudCannon has a really nice blog editor.
Don't get me wrong, I really love how simple the Decap CMS is, especially after two decades of fighting with Wordpress and Drupal. But if your client is coming from a full fledged CMS, on first impression the Decap CMS blog editor feels like a basic rich text editor.
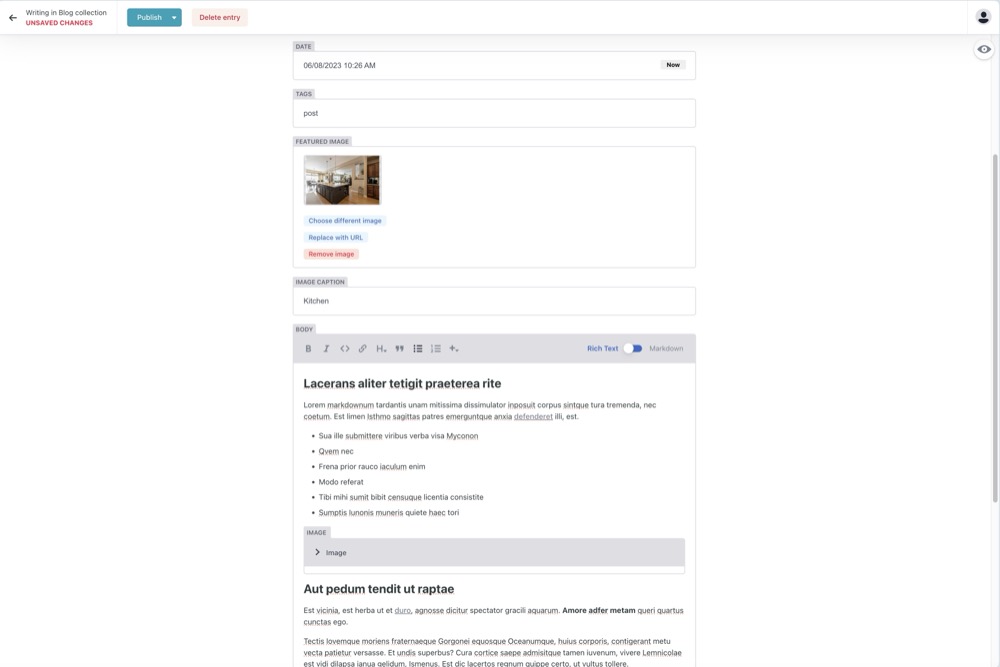
The CloudCannon blog editor, on the other hand, is really nice. It has a clean interface, it's easy to add and edit content, and it has a built-in image uploader that makes it easy to add images to your blog posts.
If you've ever dealt with adding image captions in markdown, you'll appreciate how much smoother this is. The document fields are to the left and you have a large work area to write your blog post. With Decap CMS, the blog editor feels like an afterthought, essentially a markdown editor with a rich text toggle.
Another big difference is that CloudCannon saves the user's work as they're writing and fleshing out a blog post. This is important because most users don't want to publish a half done blog post, but Decap CMS doesn't handle the draft state very well since it's basically a frontend to git.
So if you start writing a blog post and then navigate away, or if your browser crashes, you could lose all your work. CloudCannon handles this much better by saving drafts and allowing you to come back to them later and then save and publish when you're ready.
And again the image uploader is a night and day difference. In Decap, you can only see images from the folder where you've specified your blog images live. In CloudCannon, you can browse through the entire project, which is important for a non-technical user who wants to use an image from another page or section of the site.
It's little experiences like this that make a big difference for non-technical users. Remember the goal is to reduce the bloat of an unnecessarily complex CMS, but then inch it up a little from just pure code, to get to something that is just the right amount of UI for your client.
I know this isn't supposed to be a comparison article but I do think CloudCannon is a really good step up from Decap CMS, without changing your static workflow. But convenience isn't free, and I'll get to that in a moment.
CloudCannon Bookshop Page Builder
One other thing that is important to mention is that CloudCannon has a path for you to add features to your site as it grows, without having to switch to another more robust CMS. For example, if you want to give your users the ability to create a page with a visual builder, CloudCannon has a feature called Bookshop that allows you to do just that.
I won't go into much detail on Bookshop here, but it's worth mentioning because marketing teams often want to be able to create landing pages for campaigns, and they want to be able to do it themselves without having to go through a developer. With Bookshop, you can give them that power while still keeping the rest of the site in a static site builder like 11ty or Astro.
Here's a link to the CloudCannon documentation on Bookshop using Eleventy.

CloudCannon Pricing: Is It Worth the Cost?
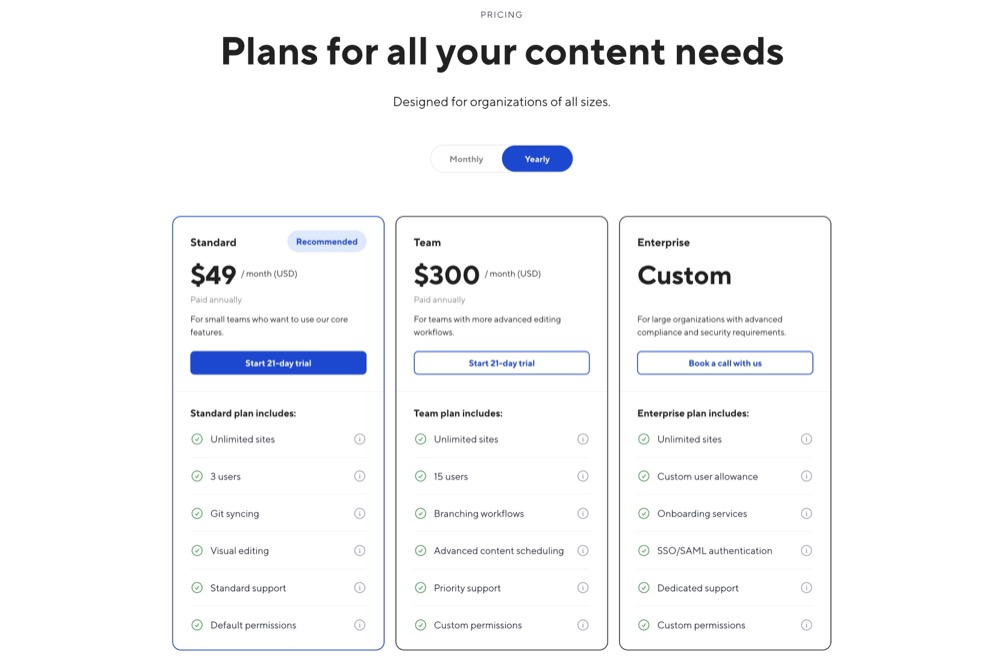
So now for the part where you decide if the benefit is worth the cost. Unlike Decap CMS, which is free and open source, CloudCannon is a paid service. They have a few different pricing plans, starting with $49/month for the Standard plan, which includes 3 users and unlimited sites.
But if you have a client who is moving away from Wordpress, for example, remember that CloudCannon includes hosting, if you choose to use it rather than hosting with Netlify or another service.
The other benefit is that the user management experience in CloudCannon is more polished than Decap CMS, which recently ended support for Netlify Identity. So with Decap you would now need to setup OAuth or use a third party service like Decap Bridge.
With CloudCannon you have custom user roles and permissions, and you can easily manage users from the CloudCannon dashboard. So even if nothing else, the user management piece of CloudCannon will set your clients up to make site changes without having to jump through some technical hoops.

The last thing I wanted to point out is CloudCannon has a Partner Program for agencies and freelancers who want to use CloudCannon for multiple clients, and it starts at $10/month. I don't know all the details of how the Partner Program works, as opposed to signing up for a standard plan, but it's worth checking it out.
If it truly is $10/month for freelancers, then it's a no brainer for what you're getting.